
 1. VB.Net - Regular Expressions
A regular expression is a pattern that could be matched against an input text. The .Net framework provides a regular expression engi...


 1. VB.Net - Regular Expressions
A regular expression is a pattern that could be matched against an input text. The .Net framework provides a regular expression engi...
2. VB.Net - Database Access
Applications communicate with a database, firstly, to retrieve the data stored there and present it in a user-friendly way, and second...
3. VB.Net - Excel Sheet
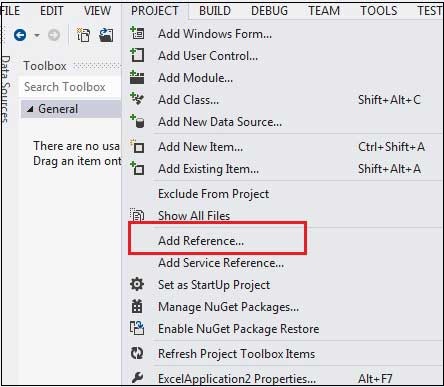
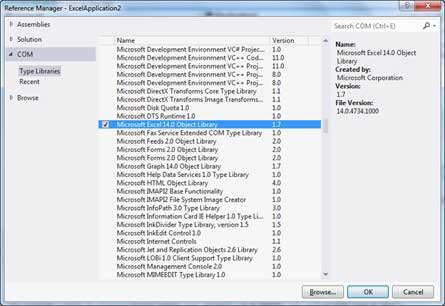
VB.Net provides support for interoperability between the COM object model of Microsoft Excel 2010 and your application. To avail this ...
4. VB.Net - Send Email
VB.Net allows sending e-mails from your application. The System.Net.Mail namespace contains classes used for sending e-mails to a Simp...
5. VB.Net - XML Processing
The Extensible Markup Language (XML) is a markup language much like HTML or SGML. This is recommended by the World Wide Web Consortium...
6. VB.Net - Web Programming
A dynamic web application consists of either or both of the following two types of programs: Server-side scripting - these are p...
Replace these every slider sentences with your featured post descriptions.Go to Blogger edit html and find these sentences.Now replace these with your own descriptions.

Replace these every slider sentences with your featured post descriptions.Go to Blogger edit html and find these sentences.Now replace these with your own descriptions.

Replace these every slider sentences with your featured post descriptions.Go to Blogger edit html and find these sentences.Now replace these with your own descriptions.

| S.N | Methods & Description |
|---|---|
| 1 | Public Function IsMatch (input As String) As Boolean Indicates whether the regular expression specified in the Regex constructor finds a match in a specified input string. |
| 2 | Public Function IsMatch (input As String, startat As Integer ) As Boolean Indicates whether the regular expression specified in the Regex constructor finds a match in the specified input string, beginning at the specified starting position in the string. |
| 3 | Public Shared Function IsMatch (input As String, pattern As String ) As Boolean Indicates whether the specified regular expression finds a match in the specified input string. |
| 4 | Public Function Matches (input As String) As MatchCollection Searches the specified input string for all occurrences of a regular expression. |
| 5 | Public Function Replace (input As String, replacement As String) As String In a specified input string, replaces all strings that match a regular expression pattern with a specified replacement string. |
| 6 | Public Function Split (input As String) As String() Splits an input string into an array of substrings at the positions defined by a regular expression pattern specified in the Regex constructor. |
Imports System.Text.RegularExpressions
Module regexProg
   Sub showMatch(ByVal text As String, ByVal expr As String)
      Console.WriteLine("The Expression: " + expr)
      Dim mc As MatchCollection = Regex.Matches(text, expr)
      Dim m As Match
      For Each m In mc
          Console.WriteLine(m)
      Next m
   End Sub
   Sub Main()
      Dim str As String = "A Thousand Splendid Suns"
      Console.WriteLine("Matching words that start with 'S': ")
      showMatch(str, "\bS\S*")
      Console.ReadKey()
   End Sub
End Module
When the above code is compiled and executed, it produces the following result:
Matching words that start with 'S':
The Expression: \bS\S*
Splendid
Suns
Imports System.Text.RegularExpressions
Module regexProg
   Sub showMatch(ByVal text As String, ByVal expr As String)
      Console.WriteLine("The Expression: " + expr)
      Dim mc As MatchCollection = Regex.Matches(text, expr)
      Dim m As Match
      For Each m In mc
          Console.WriteLine(m)
      Next m
   End Sub
   Sub Main()
      Dim str As String = "make a maze and manage to measure it"
      Console.WriteLine("Matching words that start with 'm' and ends with 'e': ")
      showMatch(str, "\bm\S*e\b")
      Console.ReadKey()
   End Sub
End Module
When the above code is compiled and executed, it produces the following result:
Matching words start with 'm' and ends with 'e':
The Expression: \bm\S*e\b
make
maze
manage
measure
Imports System.Text.RegularExpressions
Module regexProg
   Sub Main()
      Dim input As String = "Hello    World   "
      Dim pattern As String = "\\s+"
      Dim replacement As String = " "
      Dim rgx As Regex = New Regex(pattern)
      Dim result As String = rgx.Replace(input, replacement)
      Console.WriteLine("Original String: {0}", input)
      Console.WriteLine("Replacement String: {0}", result)
      Console.ReadKey()
   End Sub
End Module
When the above code is compiled and executed, it produces the following result:
Original String: Hello   World
Replacement String: Hello World

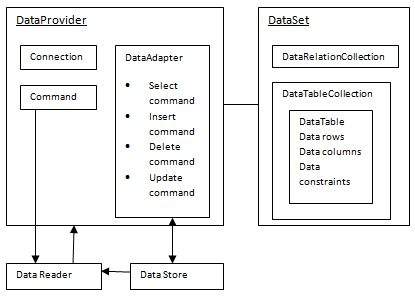 The data residing in a data store or database is retrieved through the data provider. Various components of the data provider retrieve data for the application and update data.
 | S.N | Objects & Description |
|---|---|
| 1 | Connection This component is used to set up a connection with a data source. |
| 2 | Command A command is a SQL statement or a stored procedure used to retrieve, insert, delete or modify data in a data source. |
| 3 | DataReader Data reader is used to retrieve data from a data source in a read-only and forward-only mode. |
| 4 | DataAdapter This is integral to the working of ADO.Net since data is transferred to and from a database through a data adapter. It retrieves data from a database into a dataset and updates the database. When changes are made to the dataset, the changes in the database are actually done by the data adapter. |
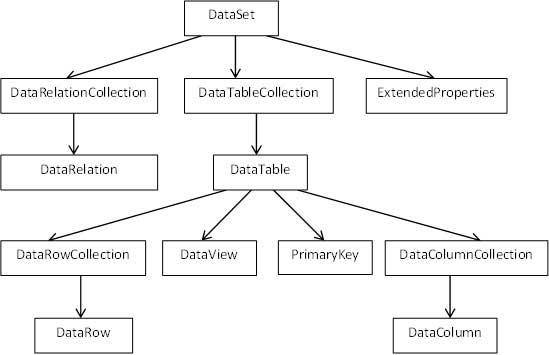 The DataSet class is present in the System.Data namespace. The following table describes all the components of DataSet:
| S.N | Components & Description |
|---|---|
| 1 | DataTableCollection It contains all the tables retrieved from the data source. |
| 2 | DataRelationCollection It contains relationships and the links between tables in a data set. |
| 3 | ExtendedProperties It contains additional information, like the SQL statement for retrieving data, time of retrieval, etc. |
| 4 | DataTable It represents a table in the DataTableCollection of a dataset. It consists of the DataRow and DataColumn objects. The DataTable objects are case-sensitive. |
| 5 | DataRelation It represents a relationship in the DataRelationshipCollection of the dataset. It is used to relate two DataTable objects to each other through the DataColumn objects. |
| 6 | DataRowCollection It contains all the rows in a DataTable. |
| 7 | DataView It represents a fixed customized view of a DataTable for sorting, filtering, searching, editing and navigation. |
| 8 | PrimaryKey It represents the column that uniquely identifies a row in a DataTable. |
| 9 | DataRow It represents a row in the DataTable. The DataRow object and its properties and methods are used to retrieve, evaluate, insert, delete, and update values in the DataTable. The NewRow method is used to create a new row and the Add method adds a row to the table. |
| 10 | DataColumnCollection It represents all the columns in a DataTable. |
| 11 | DataColumn It consists of the number of columns that comprise a DataTable. |
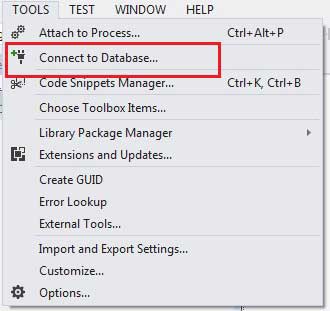
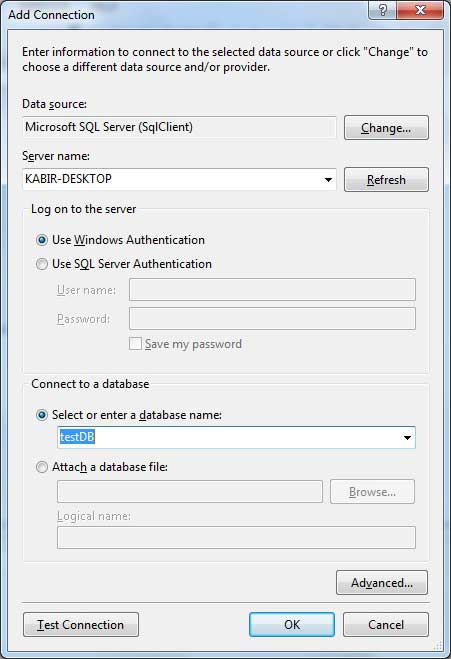
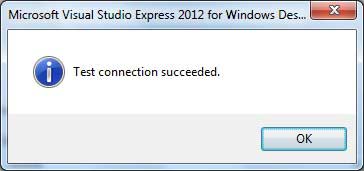
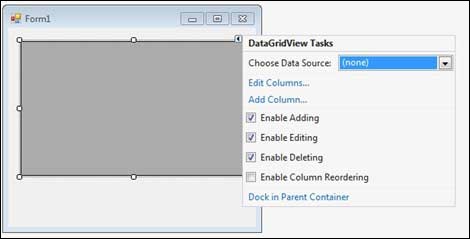
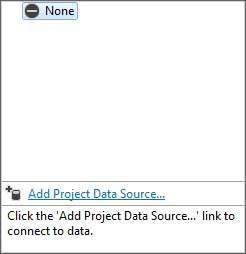
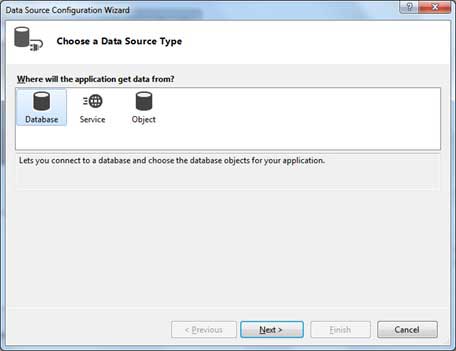
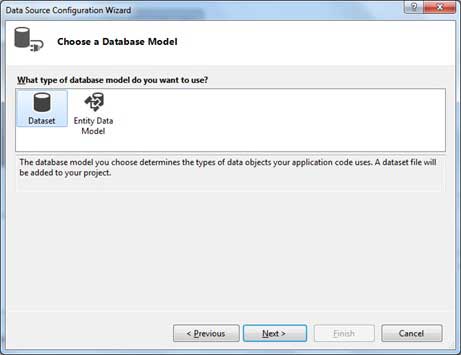
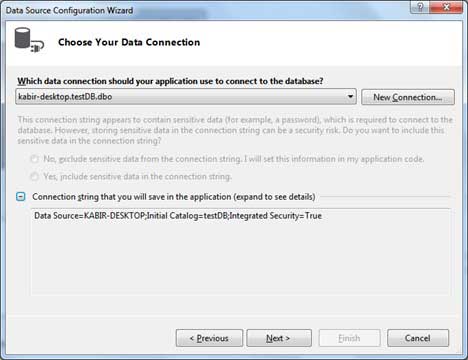
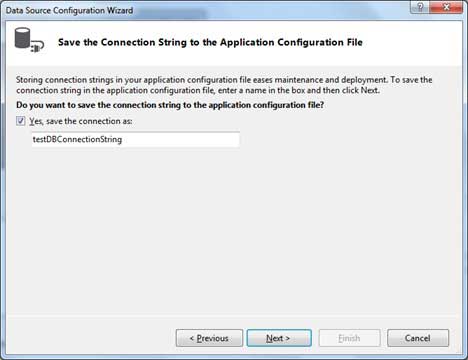
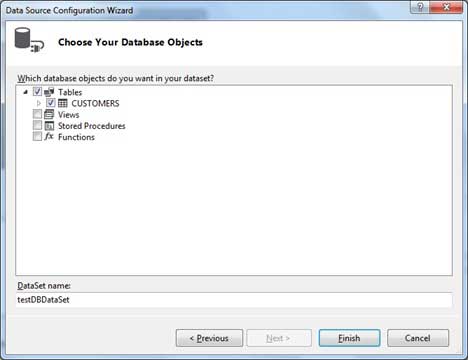
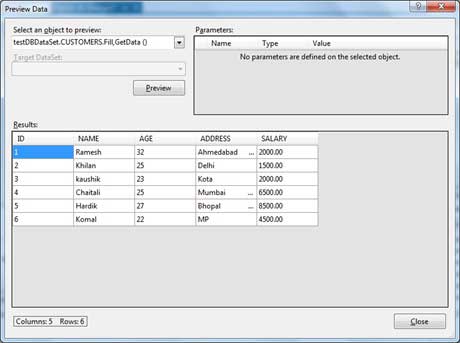
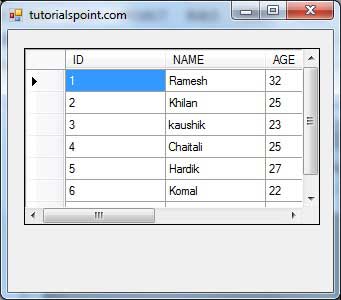
Imports System.Data.SqlClient
Public Class Form1
   Private Sub Form1_Load(sender As Object, e As EventArgs) _
   Handles MyBase.Load
        'TODO: This line of code loads data into the 'TestDBDataSet.CUSTOMERS' table.   You can move, or remove it, as needed.
      Me.CUSTOMERSTableAdapter.Fill(Me.TestDBDataSet.CUSTOMERS)
      ' Set the caption bar text of the form.
      Me.Text = "tutorialspoint.com"
   End Sub
   Private Sub Button1_Click(sender As Object, e As EventArgs) Handles Button1.Click
      Dim connection As SqlConnection = New sqlconnection()
      connection.ConnectionString = "Data Source=KABIR-DESKTOP; _
          Initial Catalog=testDB;Integrated Security=True"
      connection.Open()
      Dim adp As SqlDataAdapter = New SqlDataAdapter _
      ("select * from Customers", connection)
      Dim ds As DataSet = New DataSet()
      adp.Fill(ds)
      DataGridView1.DataSource = ds.Tables(0)
   End Sub
End Class
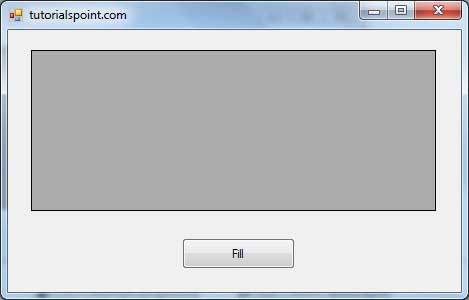
When the above code is executed and run using Start button available at the Microsoft Visual Studio tool bar, it will show the following window:
 Clicking the Fill button displays the table on the data grid view control: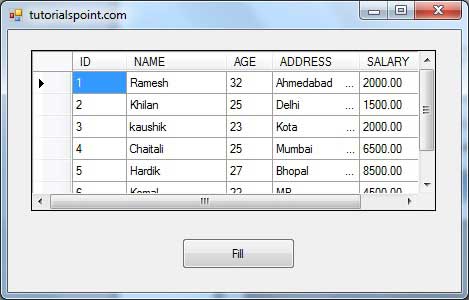
Public Class Form1
   Private Sub Form1_Load(sender As Object, e As EventArgs) Handles MyBase.Load
      ' Set the caption bar text of the form.
      Me.Text = "tutorialspont.com"
   End Sub
   Private Function CreateDataSet() As DataSet
      'creating a DataSet object for tables
      Dim dataset As DataSet = New DataSet()
      ' creating the student table
      Dim Students As DataTable = CreateStudentTable()
      dataset.Tables.Add(Students)
      Return dataset
   End Function
   Private Function CreateStudentTable() As DataTable
      Dim Students As DataTable
      Students = New DataTable("Student")
      ' adding columns
      AddNewColumn(Students, "System.Int32", "StudentID")
      AddNewColumn(Students, "System.String", "StudentName")
      AddNewColumn(Students, "System.String", "StudentCity")
      ' adding rows
      AddNewRow(Students, 1, "Zara Ali", "Kolkata")
      AddNewRow(Students, 2, "Shreya Sharma", "Delhi")
      AddNewRow(Students, 3, "Rini Mukherjee", "Hyderabad")
      AddNewRow(Students, 4, "Sunil Dubey", "Bikaner")
      AddNewRow(Students, 5, "Rajat Mishra", "Patna")
      Return Students
   End Function
   Private Sub AddNewColumn(ByRef table As DataTable, _
   ByVal columnType As String, ByVal columnName As String)
      Dim column As DataColumn = _
       table.Columns.Add(columnName, Type.GetType(columnType))
   End Sub

   'adding data into the table
   Private Sub AddNewRow(ByRef table As DataTable, ByRef id As Integer,_
   ByRef name As String, ByRef city As String)
      Dim newrow As DataRow = table.NewRow()
      newrow("StudentID") = id
      newrow("StudentName") = name
      newrow("StudentCity") = city
      table.Rows.Add(newrow)
   End Sub
   Private Sub Button1_Click(sender As Object, e As EventArgs) Handles Button1.Click
      Dim ds As New DataSet
      ds = CreateDataSet()
      DataGridView1.DataSource = ds.Tables("Student")
   End Sub
End Class
When the above code is executed and run using Start button available at the Microsoft Visual Studio tool bar, it will show the following window:
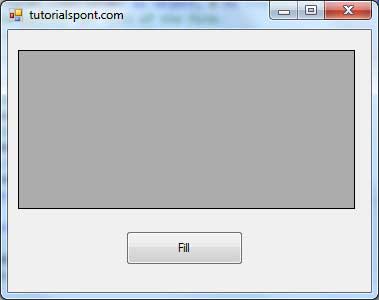 Clicking the Fill button displays the table on the data grid view control: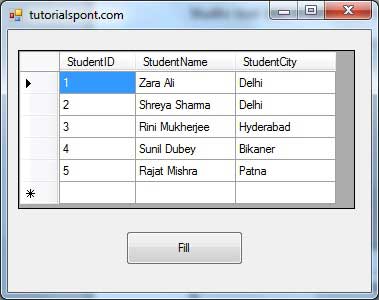
'  Add the following code snippet on top of Form1.vb
Imports Excel = Microsoft.Office.Interop.Excel
Public Class Form1
   Private Sub Button1_Click(sender As Object, e As EventArgs) Handles Button1.Click
      Dim appXL As Excel.Application
      Dim wbXl As Excel.Workbook
      Dim shXL As Excel.Worksheet
      Dim raXL As Excel.Range
      ' Start Excel and get Application object.
      appXL = CreateObject("Excel.Application")
      appXL.Visible = True
      ' Add a new workbook.
      wbXl = appXL.Workbooks.Add
      shXL = wbXl.ActiveSheet
      ' Add table headers going cell by cell.
      shXL.Cells(1, 1).Value = "First Name"
      shXL.Cells(1, 2).Value = "Last Name"
      shXL.Cells(1, 3).Value = "Full Name"
      shXL.Cells(1, 4).Value = "Specialization"
      ' Format A1:D1 as bold, vertical alignment = center.
      With shXL.Range("A1", "D1")
          .Font.Bold = True
          .VerticalAlignment = Excel.XlVAlign.xlVAlignCenter
      End With
      ' Create an array to set multiple values at once.
      Dim students(5, 2) As String
      students(0, 0) = "Zara"
      students(0, 1) = "Ali"
      students(1, 0) = "Nuha"
      students(1, 1) = "Ali"
      students(2, 0) = "Arilia"
      students(2, 1) = "RamKumar"
      students(3, 0) = "Rita"
      students(3, 1) = "Jones"
      students(4, 0) = "Umme"
      students(4, 1) = "Ayman"
      ' Fill A2:B6 with an array of values (First and Last Names).
      shXL.Range("A2", "B6").Value = students
       ' Fill C2:C6 with a relative formula (=A2 & " " & B2).
      raXL = shXL.Range("C2", "C6")
      raXL.Formula = "=A2 & "" "" & B2"
       ' Fill D2:D6 values.
      With shXL
          .Cells(2, 4).Value = "Biology"
          .Cells(3, 4).Value = "Mathmematics"
          .Cells(4, 4).Value = "Physics"
          .Cells(5, 4).Value = "Mathmematics"
          .Cells(6, 4).Value = "Arabic"
      End With
      ' AutoFit columns A:D.
      raXL = shXL.Range("A1", "D1")
      raXL.EntireColumn.AutoFit()
       ' Make sure Excel is visible and give the user control
      ' of Excel's lifetime.
      appXL.Visible = True
      appXL.UserControl = True
       ' Release object references.
      raXL = Nothing
      shXL = Nothing
      wbXl = Nothing
      appXL.Quit()
      appXL = Nothing
      Exit Sub
Err_Handler:
      MsgBox(Err.Description, vbCritical, "Error: " & Err.Number)
   End Sub
End Class
When the above code is executed and run using Start button available at the Microsoft Visual Studio tool bar, it will show the following window:
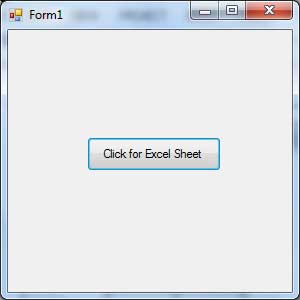 Clicking on the Button would display the following excel sheet. You will be asked to save the workbook.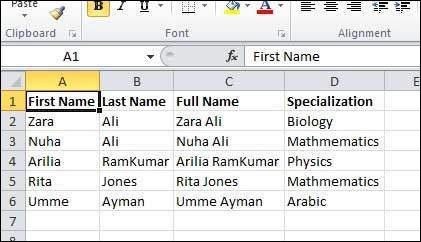
| S.N | Class | Description |
|---|---|---|
| 1 | Attachment | Represents an attachment to an e-mail. |
| 2 | AttachmentCollection | Stores attachments to be sent as part of an e-mail message. |
| 3 | MailAddress | Represents the address of an electronic mail sender or recipient. |
| 4 | MailAddressCollection | Stores e-mail addresses that are associated with an e-mail message. |
| 5 | MailMessage | Represents an e-mail message that can be sent using the SmtpClient class. |
| 6 | SmtpClient | Allows applications to send e-mail by using the Simple Mail Transfer Protocol (SMTP). |
| 7 | SmtpException | Represents the exception that is thrown when the SmtpClient is not able to complete a Send or SendAsync operation. |
| S.N | Property | Description |
|---|---|---|
| 1 | ClientCertificates | Specifies which certificates should be used to establish the Secure Sockets Layer (SSL) connection. |
| 2 | Credentials | Gets or sets the credentials used to authenticate the sender. |
| 3 | EnableSsl | Specifies whether the SmtpClient uses Secure Sockets Layer (SSL) to encrypt the connection. |
| 4 | Host | Gets or sets the name or IP address of the host used for SMTP transactions. |
| 5 | Port | Gets or sets the port used for SMTP transactions. |
| 6 | Timeout | Gets or sets a value that specifies the amount of time after which a synchronous Send call times out. |
| 7 | UseDefaultCredentials | Gets or sets a Boolean value that controls whether the DefaultCredentials are sent with requests. |
| S.N | Method & Description |
|---|---|
| 1 | Dispose Sends a QUIT message to the SMTP server, gracefully ends the TCP connection, and releases all resources used by the current instance of the SmtpClient class. |
| 2 | Dispose(Boolean) Sends a QUIT message to the SMTP server, gracefully ends the TCP connection, releases all resources used by the current instance of the SmtpClient class, and optionally disposes of the managed resources. |
| 3 | OnSendCompleted Raises the SendCompleted event. |
| 4 | Send(MailMessage) Sends the specified message to an SMTP server for delivery. |
| 5 | Send(String, String, String, String) Sends the specified e-mail message to an SMTP server for delivery. The message sender, recipients, subject, and message body are specified using String objects. |
| 6 | SendAsync(MailMessage, Object) Sends the specified e-mail message to an SMTP server for delivery. This method does not block the calling thread and allows the caller to pass an object to the method that is invoked when the operation completes. |
| 7 | SendAsync(String, String, String, String, Object) Sends an e-mail message to an SMTP server for delivery. The message sender, recipients, subject, and message body are specified using String objects. This method does not block the calling thread and allows the caller to pass an object to the method that is invoked when the operation completes. |
| 8 | SendAsyncCancel Cancels an asynchronous operation to send an e-mail message. |
| 9 | SendMailAsync(MailMessage) Sends the specified message to an SMTP server for delivery as an asynchronous operation. |
| 10 | SendMailAsync(String, String, String, String) Sends the specified message to an SMTP server for delivery as an asynchronous operation. . The message sender, recipients, subject, and message body are specified using String objects. |
| 11 | ToString Returns a string that represents the current object. |
Imports System.Net.Mail
Public Class Form1
   Private Sub Form1_Load(sender As Object, e As EventArgs) Handles MyBase.Load
      ' Set the caption bar text of the form.
      Me.Text = "tutorialspoint.com"
   End Sub

   Private Sub Button1_Click(sender As Object, e As EventArgs) Handles Button1.Click
      Try
          Dim Smtp_Server As New SmtpClient
          Dim e_mail As New MailMessage()
          Smtp_Server.UseDefaultCredentials = False
          Smtp_Server.Credentials = New Net.NetworkCredential("username@gmail.com", "password")
          Smtp_Server.Port = 587
          Smtp_Server.EnableSsl = True
          Smtp_Server.Host = "smtp.gmail.com"

          e_mail = New MailMessage()
          e_mail.From = New MailAddress(txtFrom.Text)
          e_mail.To.Add(txtTo.Text)
          e_mail.Subject = "Email Sending"
          e_mail.IsBodyHtml = False
          e_mail.Body = txtMessage.Text
          Smtp_Server.Send(e_mail)
          MsgBox("Mail Sent")

      Catch error_t As Exception
          MsgBox(error_t.ToString)
      End Try

   End Sub
You must provide your gmail address and real password for credentials.
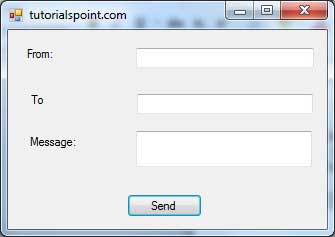
| S.N | Class | Description |
|---|---|---|
| 1 | XmlAttribute | Represents an attribute. Valid and default values for the attribute are defined in a document type definition (DTD) or schema. |
| 2 | XmlCDataSection | Represents a CDATA section. |
| 3 | XmlCharacterData | Provides text manipulation methods that are used by several classes. |
| 4 | XmlComment | Represents the content of an XML comment. |
| 5 | XmlConvert | Encodes and decodes XML names and provides methods for converting between common language runtime types and XML Schema definition language (XSD) types. When converting data types, the values returned are locale independent. |
| 6 | XmlDeclaration | Represents the XML declaration node . |
| 7 | XmlDictionary | Implements a dictionary used to optimize Windows Communication Foundation (WCF)'s XML reader/writer implementations. |
| 8 | XmlDictionaryReader | An abstract class that the Windows Communication Foundation (WCF) derives from XmlReader to do serialization and deserialization. |
| 9 | XmlDictionaryWriter | Represents an abstract class that Windows Communication Foundation (WCF) derives from XmlWriter to do serialization and deserialization. |
| 10 | XmlDocument | Represents an XML document. |
| 11 | XmlDocumentFragment | Represents a lightweight object that is useful for tree insert operations. |
| 12 | XmlDocumentType | Represents the document type declaration. |
| 13 | XmlElement | Represents an element. |
| 14 | XmlEntity | Represents an entity declaration, such as . |
| 15 | XmlEntityReference | Represents an entity reference node. |
| 16 | XmlException | Returns detailed information about the last exception. |
| 17 | XmlImplementation | Defines the context for a set of XmlDocument objects. |
| 18 | XmlLinkedNode | Gets the node immediately preceding or following this node. |
| 19 | XmlNode | Represents a single node in the XML document. |
| 20 | XmlNodeList | Represents an ordered collection of nodes. |
| 21 | XmlNodeReader | Represents a reader that provides fast, non-cached forward only access to XML data in an XmlNode. |
| 22 | XmlNotation | Represents a notation declaration, such as . |
| 23 | XmlParserContext | Provides all the context information required by the XmlReader to parse an XML fragment. |
| 24 | XmlProcessingInstruction | Represents a processing instruction, which XML defines to keep processor-specific information in the text of the document. |
| 25 | XmlQualifiedName | Represents an XML qualified name. |
| 26 | XmlReader | Represents a reader that provides fast, noncached, forward-only access to XML data. |
| 27 | XmlReaderSettings | Specifies a set of features to support on the XmlReader object created by the Create method. |
| 28 | XmlResolver | Resolves external XML resources named by a Uniform Resource Identifier (URI). |
| 29 | XmlSecureResolver | Helps to secure another implementation of XmlResolver by wrapping the XmlResolver object and restricting the resources that the underlying XmlResolver has access to. |
| 30 | XmlSignificantWhitespace | Represents white space between markup in a mixed content node or white space within an xml:space= 'preserve' scope. This is also referred to as significant white space. |
| 31 | XmlText | Represents the text content of an element or attribute. |
| 32 | XmlTextReader | Represents a reader that provides fast, non-cached, forward-only access to XML data. |
| 33 | XmlTextWriter | Represents a writer that provides a fast, non-cached, forward-only way of generating streams or files containing XML data that conforms to the W3C Extensible Markup Language (XML) 1.0 and the Namespaces in XML recommendations. |
| 34 | XmlUrlResolver | Resolves external XML resources named by a Uniform Resource Identifier (URI). |
| 35 | XmlWhitespace | Represents white space in element content. |
| 36 | XmlWriter | Represents a writer that provides a fast, non-cached, forward-only means of generating streams or files containing XML data. |
| 37 | XmlWriterSettings | Specifies a set of features to support on the XmlWriter object created by the XmlWriter.Create method. |
xml version="1.0"?>
shelf="New Arrivals">
title="Enemy Behind">
Imports System.Xml
Public Class Form1

   Private Sub Form1_Load(sender As Object, e As EventArgs) Handles MyBase.Load
      ' Set the caption bar text of the form.
      Me.Text = "tutorialspoint.com"
   End Sub
   Private Sub Button1_Click(sender As Object, e As EventArgs) Handles Button1.Click
      ListBox1().Items.Clear()
      Dim xr As XmlReader = XmlReader.Create("movies.xml")
      Do While xr.Read()
          If xr.NodeType = XmlNodeType.Element AndAlso xr.Name = "movie" Then
              ListBox1.Items.Add(xr.GetAttribute(0))
          End If
      Loop
   End Sub
   Private Sub Button2_Click(sender As Object, e As EventArgs) Handles Button2.Click
      ListBox2().Items.Clear()
      Dim xr As XmlReader = XmlReader.Create("movies.xml")
      Do While xr.Read()
          If xr.NodeType = XmlNodeType.Element AndAlso xr.Name = "type" Then
              ListBox2.Items.Add(xr.ReadElementString)
          Else
              xr.Read()
          End If
      Loop
   End Sub
   Private Sub Button3_Click(sender As Object, e As EventArgs) Handles Button3.Click
      ListBox3().Items.Clear()
      Dim xr As XmlReader = XmlReader.Create("movies.xml")
      Do While xr.Read()
          If xr.NodeType = XmlNodeType.Element AndAlso xr.Name = "description" Then
              ListBox3.Items.Add(xr.ReadElementString)
          Else
              xr.Read()
          End If
      Loop
   End Sub
End Class
Execute and run the above code using Start button available at the Microsoft Visual Studio tool bar. Clicking on the buttons would display, title, type and description of the movies from the file.
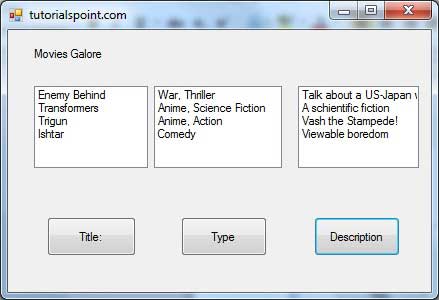 The XmlWriter class is used to write XML data into a stream, a
file or a TextWriter object. It also works in a forward-only,
non-cached manner.
The XmlWriter class is used to write XML data into a stream, a
file or a TextWriter object. It also works in a forward-only,
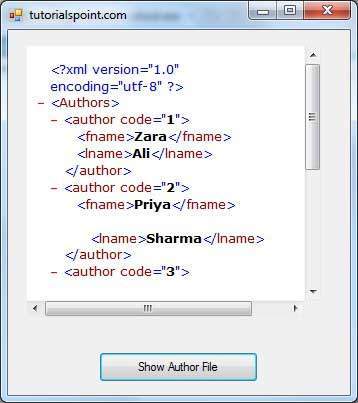
non-cached manner. Imports System.Xml Public Class Form1 Private Sub Form1_Load(sender As Object, e As EventArgs) Handles MyBase.Load ' Set the caption bar text of the form. Me.Text = "tutorialspoint.com" End Sub Private Sub Button1_Click(sender As Object, e As EventArgs) Handles Button1.Click Dim xws As XmlWriterSettings = New XmlWriterSettings() xws.Indent = True xws.NewLineOnAttributes = True Dim xw As XmlWriter = XmlWriter.Create("authors.xml", xws) xw.WriteStartDocument() xw.WriteStartElement("Authors") xw.WriteStartElement("author") xw.WriteAttributeString("code", "1") xw.WriteElementString("fname", "Zara") xw.WriteElementString("lname", "Ali") xw.WriteEndElement() xw.WriteStartElement("author") xw.WriteAttributeString("code", "2") xw.WriteElementString("fname", "Priya") xw.WriteElementString("lname", "Sharma") xw.WriteEndElement() xw.WriteStartElement("author") xw.WriteAttributeString("code", "3") xw.WriteElementString("fname", "Anshuman") xw.WriteElementString("lname", "Mohan") xw.WriteEndElement() xw.WriteStartElement("author") xw.WriteAttributeString("code", "4") xw.WriteElementString("fname", "Bibhuti") xw.WriteElementString("lname", "Banerjee") xw.WriteEndElement() xw.WriteStartElement("author") xw.WriteAttributeString("code", "5") xw.WriteElementString("fname", "Riyan") xw.WriteElementString("lname", "Sengupta") xw.WriteEndElement() xw.WriteEndElement() xw.WriteEndDocument() xw.Flush() xw.Close() WebBrowser1.Url = New Uri(AppDomain.CurrentDomain.BaseDirectory + "authors.xml") End Sub End ClassExecute and run the above code using Start button available at the Microsoft Visual Studio tool bar. Clicking on the Show Author File would display the newly created authors.xml file on the web browser.
| S.N | Method Name & Description |
|---|---|
| 1 | AppendChild Adds the specified node to the end of the list of child nodes, of this node. |
| 2 | CreateAttribute(String) Creates an XmlAttribute with the specified Name. |
| 3 | CreateComment Creates an XmlComment containing the specified data. |
| 4 | CreateDefaultAttribute Creates a default attribute with the specified prefix, local name and namespace URI. |
| 5 | CreateElement(String) Creates an element with the specified name. |
| 6 | CreateNode(String, String, String) Creates an XmlNode with the specified node type, Name, and NamespaceURI. |
| 7 | CreateNode(XmlNodeType, String, String) Creates an XmlNode with the specified XmlNodeType, Name, and NamespaceURI. |
| 8 | CreateNode(XmlNodeType, String, String, String) Creates a XmlNode with the specified XmlNodeType, Prefix, Name, and NamespaceURI. |
| 9 | CreateProcessingInstruction Creates an XmlProcessingInstruction with the specified name and data. |
| 10 | CreateSignificantWhitespace Creates an XmlSignificantWhitespace node. |
| 11 | CreateTextNode Creates an XmlText with the specified text. |
| 12 | CreateWhitespace Creates an XmlWhitespace node. |
| 13 | CreateXmlDeclaration Creates an XmlDeclaration node with the specified values. |
| 14 | GetElementById Gets the XmlElement with the specified ID. |
| 15 | GetElementsByTagName(String) Returns an XmlNodeList containing a list of all descendant elements that match the specified Name. |
| 16 | GetElementsByTagName(String, String) Returns an XmlNodeList containing a list of all descendant elements that match the specified LocalName and NamespaceURI. |
| 17 | InsertAfter Inserts the specified node immediately after the specified reference node. |
| 18 | InsertBefore Inserts the specified node immediately before the specified reference node. |
| 19 | Load(Stream) Loads the XML document from the specified stream. |
| 20 | Load(String) Loads the XML document from the specified URL. |
| 21 | Load(TextReader) Loads the XML document from the specified TextReader. |
| 22 | Load(XmlReader) Loads the XML document from the specified XmlReader. |
| 23 | LoadXml Loads the XML document from the specified string. |
| 24 | PrependChild Adds the specified node to the beginning of the list of child nodes for this node. |
| 25 | ReadNode Creates an XmlNode object based on the information in the XmlReader. The reader must be positioned on a node or attribute. |
| 26 | RemoveAll Removes all the child nodes and/or attributes of the current node. |
| 27 | RemoveChild Removes specified child node. |
| 28 | ReplaceChild Replaces the child node oldChild with newChild node. |
| 29 | Save(Stream) Saves the XML document to the specified stream. |
| 30 | Save(String) Saves the XML document to the specified file. |
| 31 | Save(TextWriter) Saves the XML document to the specified TextWriter. |
| 32 | Save(XmlWriter) Saves the XML document to the specified XmlWriter. |
Imports System.Xml
Public Class Form1
   Private Sub Form1_Load(sender As Object, e As EventArgs) Handles MyBase.Load
      ' Set the caption bar text of the form.
      Me.Text = "tutorialspoint.com"
   End Sub
   Private Sub Button1_Click(sender As Object, e As EventArgs) Handles Button1.Click
      ListBox1.Items.Clear()
      Dim xd As XmlDocument = New XmlDocument()
      xd.Load("authors.xml")
      Dim newAuthor As XmlElement = xd.CreateElement("author")
      newAuthor.SetAttribute("code", "6")
      Dim fn As XmlElement = xd.CreateElement("fname")
      fn.InnerText = "Bikram"
      newAuthor.AppendChild(fn)
      Dim ln As XmlElement = xd.CreateElement("lname")
      ln.InnerText = "Seth"
      newAuthor.AppendChild(ln)
      xd.DocumentElement.AppendChild(newAuthor)
      Dim tr As XmlTextWriter = New XmlTextWriter("movies.xml", Nothing)
      tr.Formatting = Formatting.Indented
      xd.WriteContentTo(tr)
      tr.Close()
      Dim nl As XmlNodeList = xd.GetElementsByTagName("fname")
      For Each node As XmlNode In nl
          ListBox1.Items.Add(node.InnerText)
      Next node
   End Sub
End Class
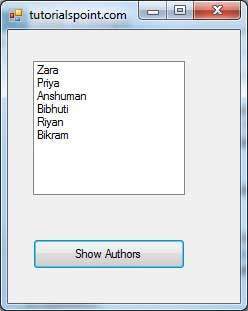
Execute and run the above code using Start button available at the Microsoft Visual Studio tool bar. Clicking on the Show Author button would display the first names of all the authors including the one we have added at runtime.
| Object | Description |
|---|---|
| Application | Describes the methods, properties, and collections of the object
that stores information related to the entire Web application, including
variables and objects that exist for the lifetime of the application. You use this object to store and retrieve information to be shared among all users of an application. For example, you can use an Application object to create an e-commerce page. |
| Request | Describes the methods, properties, and collections of the object
that stores information related to the HTTP request. This includes
forms, cookies, server variables, and certificate data. You use this object to access the information sent in a request from a browser to the server. For example, you can use a Request object to access information entered by a user in an HTML form. |
| Response | Describes the methods, properties, and collections of the object
that stores information related to the server's response. This includes
displaying content, manipulating headers, setting locales, and
redirecting requests. You use this object to send information to the browser. For example, you use a Response object to send output from your scripts to a browser. |
| Server | Describes the methods and properties of the object that provides
methods for various server tasks. With these methods you can execute
code, get error conditions, encode text strings, create objects for use
by the Web page, and map physical paths. You use this object to access various utility functions on the server. For example, you may use the Server object to set a time out for a script. |
| Session | Describes the methods, properties, and collections of the object
that stores information related to the user's session, including
variables and objects that exist for the lifetime of the session. You use this object to store and retrieve information about particular user sessions. For example, you can use Session object to keep information about the user and his preference and keep track of pending operations. |
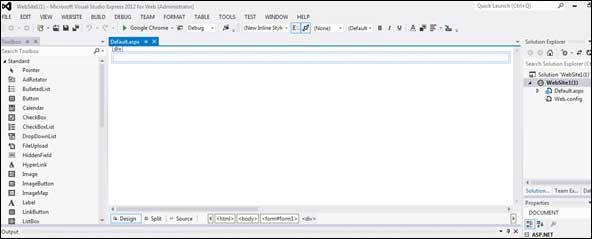
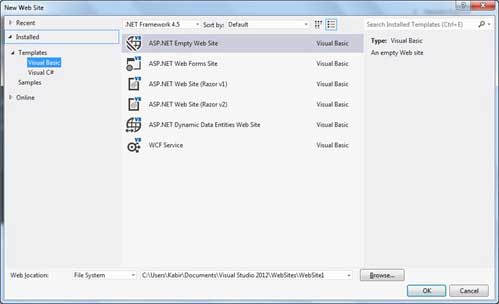
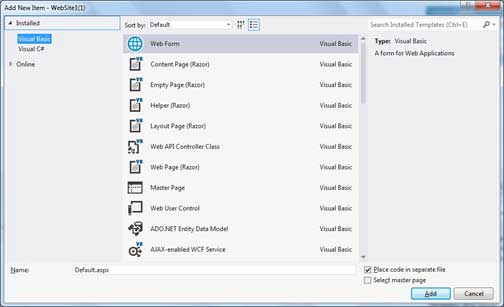
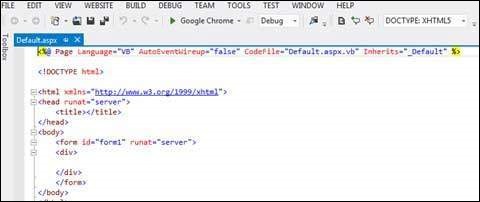
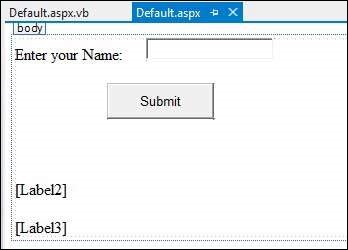
Protected Sub Button1_Click(sender As Object, e As EventArgs) _
Handles Button1.Click
   Label2.Visible = True
   Label2.Text = "Welcome to Tutorials Point: " + TextBox1.Text
   Label3.Text = "You visited us at: " + DateTime.Now.ToString()
End Sub
When the above code is executed and run using Start button available at the Microsoft Visual Studio tool bar, the following page opens in the browser:
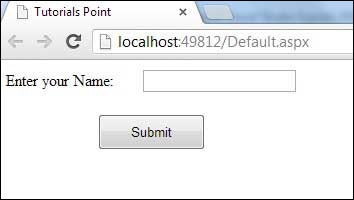 Enter your name and click on the Submit button: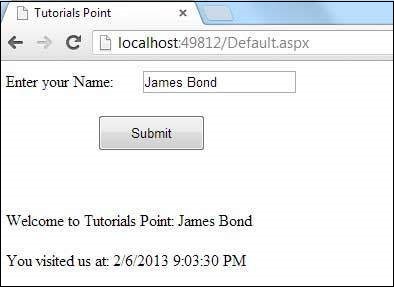
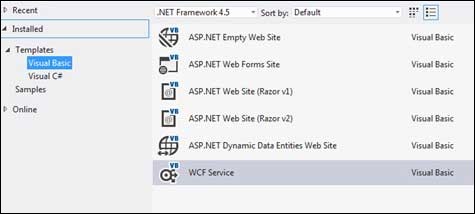
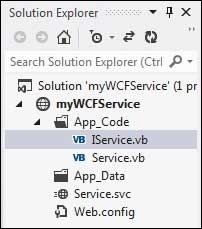
Public Interface IService
    <OperationContract()>
    Function GetPrice(ByVal symbol As String) As Double

    <OperationContract()>
    Function GetName(ByVal symbol As String) As String
End Interface
Implementing the Contract In the Service.vb file, you will find a class named Service which will implement the Service Contract defined in the IService interface.
' NOTE: You can use the "Rename" command on the context menu to change the class name "Service" in code, svc and config file together.
Public Class Service
   Implements IService
   Public Sub New()
   End Sub
   Dim stocks As String(,) =
   {
   {"RELIND", "Reliance Industries", "1060.15"},
   {"ICICI", "ICICI Bank", "911.55"},
   {"JSW", "JSW Steel", "1201.25"},
   {"WIPRO", "Wipro Limited", "1194.65"},
   {"SATYAM", "Satyam Computers", "91.10"}
   }

   Public Function GetPrice(ByVal symbol As String) As Double _
   Implements IService.GetPrice

      Dim i As Integer
      'it takes the symbol as parameter and returns price
      For i = 0 To i = stocks.GetLength(0) - 1

          If (String.Compare(symbol, stocks(i, 0)) = 0) Then
              Return Convert.ToDouble(stocks(i, 2))
          End If
      Next i
      Return 0
   End Function

   Public Function GetName(ByVal symbol As String) As String _
   Implements IService.GetName

      ' It takes the symbol as parameter and
      ' returns name of the stock
      Dim i As Integer
      For i = 0 To i = stocks.GetLength(0) - 1

          If (String.Compare(symbol, stocks(i, 0)) = 0) Then
              Return stocks(i, 1)
          End If
      Next i
      Return "Stock Not Found"
   End Function
End Class
Testing the Service To run the WCF Service, so created, select the Debug->Start Debugging option from the menu bar. The output would be:
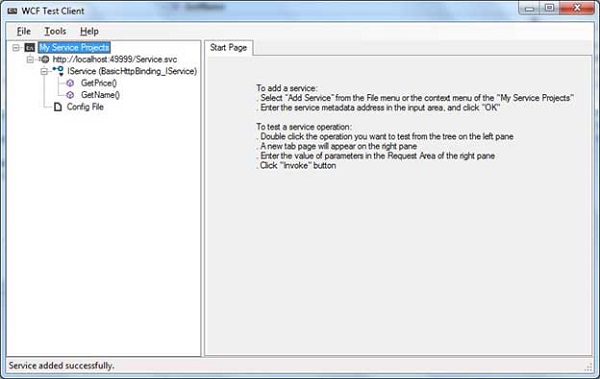 For testing the service operations, double click the name of the
operation from the tree on the left pane. A new tab will appear on the
right pane.
For testing the service operations, double click the name of the
operation from the tree on the left pane. A new tab will appear on the
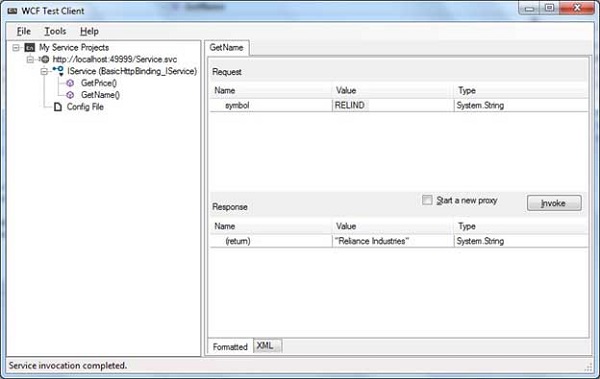
right pane.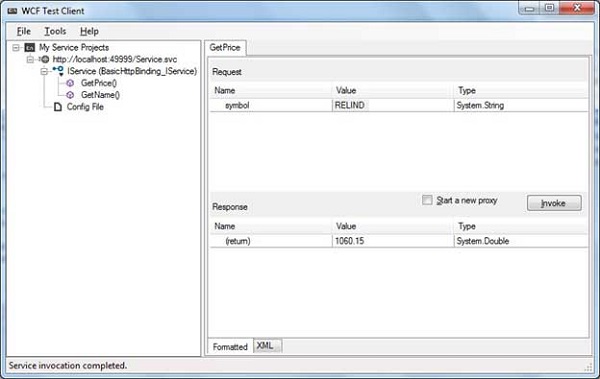 The following diagram displays the result of testing the GetName operation:
 Utilizing the Service
Let us add a default page, a ASP.NET web form in the same solution
from which we will be using the WCF Service we have just created.
Utilizing the Service
Let us add a default page, a ASP.NET web form in the same solution
from which we will be using the WCF Service we have just created. 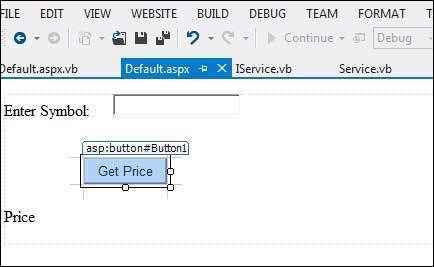
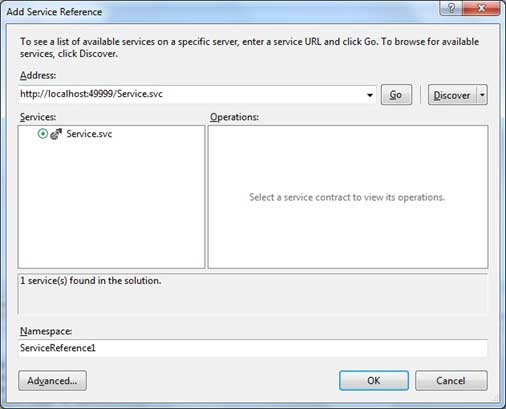 Adding the reference does two jobs for your project:
Partial Class _Default Inherits System.Web.UI.Page Protected Sub Button1_Click(sender As Object, e As EventArgs) _ Handles Button1.Click Dim ser As ServiceReference1.ServiceClient = _ New ServiceReference1.ServiceClient Label2.Text = ser.GetPrice(TextBox1.Text).ToString() End Sub End ClassWhen the above code is executed and run using Start button available at the Microsoft Visual Studio tool bar, the following page opens in the browser:
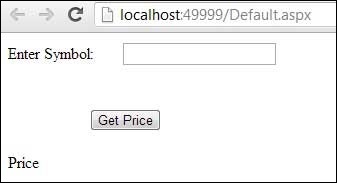 Enter a symbol and click the Get Price button to get the hard-coded price: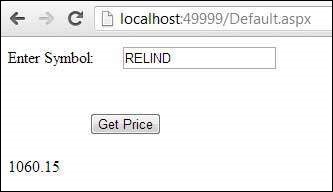


 9:11 AM
 Unknown
